|
|
Remember this template of the glitched fairy I edited?
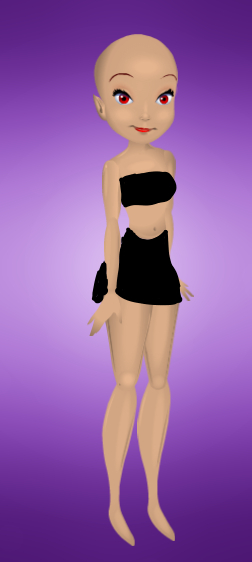
Well, thanks to the template of the fairy I downloaded (only showing her clothed for safety reasons), I now know how to make new outfits.
Materials:
At least one fairy, either 1.0 or 2.0 will work as long as she's standing in the position shown (I recommend at least three copies of said fairy, one definitely clothed in as summerlike an outfit as possible, no shoes or accessories, just a shirt and lower part)
An editing program that allows you to draw, make new layers and tint, among other items (I use FireAlpaca)
At least one outfit on your fairy
A careful eye for colour
A steady ability to draw on the computer, which can take said program
If you have at least one: a template of your fairy, otherwise, you'll have to make one
If you have at least one: a wing template (remember, these wings are translucent, but this is an optional step)
To make the template:
1a. 1.0 is a little easier to get custom outfits from, however, to ensure the position shown, I recommend 2.0.
1b. Whichever you use, make sure your fairy is wearing something that reveals the details of her limbs so you can match them better.
2a. Carefully trace the selection tool around your fairy's hair, then copy into a new layer.
2b. If the wings impede, erase carefully.
3. Continue careful selection around your fairy's hair until various layers of different parts are present.
4a. Carefully select the face too.
4b. If your fairy was made post 2020 in 2.21, her eyes will appear either almost white or match her skin if earthen-toned. If you're fine with that, you can skip to step 6. Otherwise, continue to...
4c. To recolour your fairy's eyes, make a new layer for each eye after selecting the irises, then add a new layer for each iris.
4d. Choose the colour you want for your fairy's eyes, then select a layer colour option that shows her pupils.
4e. Once you are happy with her iris colour, continue to step 5 for her lips, or if happy with the lip colour, step 6.
5a. To recolour your fairy's lips, carefully select the mouth for a new layer.
5b. In yet another layer, you'll carefully colour her lips in any colour of your choosing, provided you've chosen an option that shows the shape underneath thee colour swatch.
5c. Once done, the face is complete.
6. Once happy with your fairy's face colouration, time to move to the limbs. Carefully match the shading on your fairy's limbs as close to matching the original as possible, blurring if necessary, making sure to carefully erase any excess.
7. If your fairy was wearing a midriff top, simply select around her tummy and fill in the rest of that area in a new layer first, otherwise, just try to match her hair and waist to the natural shape.
8. This will garner lots of layers if done carefully, but once you're happy with your template, save it as a native file in the editing application, then as a .png.
9. Your .png template is now ready to try on new outfits!
10. Optional: If you want your template to have wings, try to match the wings on your fairy and any wings you find in the template.
To make a new custom outfit from existing outfits:
1. Select at least one outfit or one part of an outfit.
2. Copy into a new layer.
3. Erase carefully until only the outfit remains.
4. Copy again, but this time onto your template.
5. Position carefully until aligned onto your template.
6. You may have to tweak your template again, so carefully do so until the outfit looks like a perfect fit.
7. Repeat for each outfit part you want on your template until you've made an outfit you're happy with, taking care to separate by layer.
8. Once your new custom outfit is ready, save the outfit as a native file to your editing program, then as a .png.
9. You've now made a whole new outfit!
I should note that this is only for fairies; this mightn't work the same on sparrowmen.
|
|


 Posted on 2021-12-29 10:55:40